Sitecore - Meet the Dockers
Today I like to show you how Docker can be a really good companion for a Sitecore developer. As strange as this may sound but I am developing Sitecore on a Mac with Windows running in a VM. This has to do with my history as Mac guy and my difficulties to adapt to the Windows system's behaviour. I was searching for ways to save as much ressources on my VM as possible and to make my development environment as flexible as possible and in time I became aware of Docker.
Just for those who have never heard of Docker (which may be few): Docker is a container virtualization that allows you to package up an application with all the parts and dependencies it needs. A lot of big software companies create Docker images of their products that you can use out of the box eg. Apache Solr, MSSQL or MongoDB just to name some that can be important for Sitecore Devs.
First of all download Docker for Mac or Windows and run the installer. You can run Docker completely in the Command Line but some things just are easier with a GUI. Therefore I recommend to install Kitematic which is a GUI that supports basic operations of Docker like installing images and configure the settings of your containers. Here I will mostly use the Kitematic GUI and only switch to CMD for special operations that are not supported in Kitematic. To install just klick on Kitematic in the Docker menu and follow the instructions.
Note: If you are using Docker on Windows you must decide if you want to use Windows or Linux containers. You cannot use both!
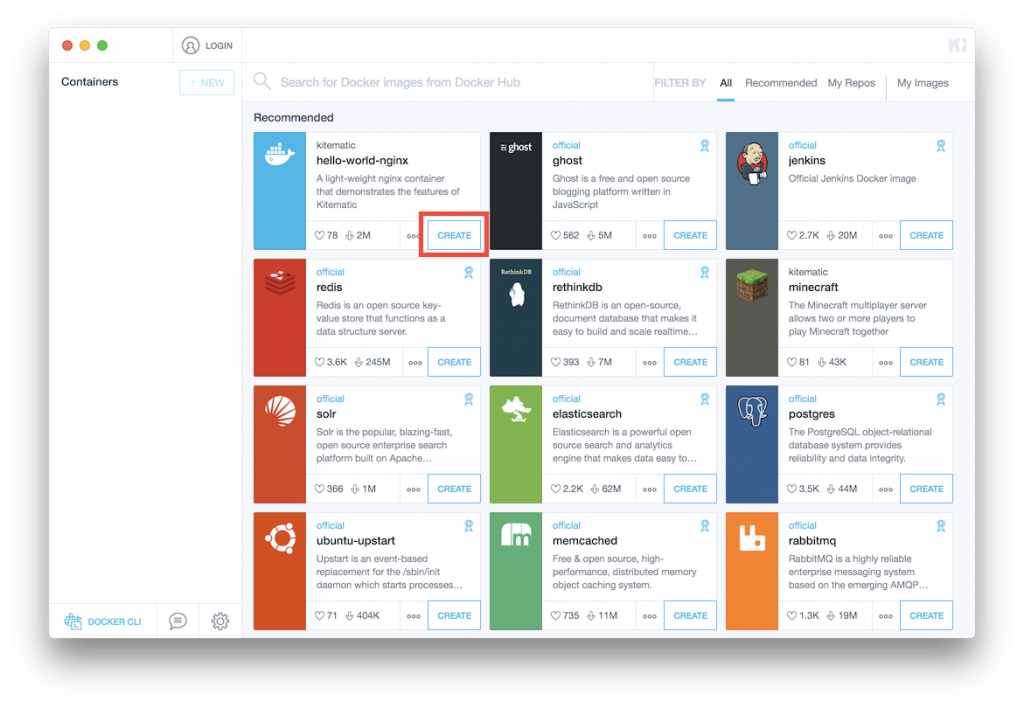
Now I show you how easy it is to get a Docker container up and running. Just open Kitematic and you get an overview of the images that are available. Just search for the one you want, click create and you are done. You are running your first Docker container.
Certainly we need to configure the container to use it for our purposes. So let's install a Microsoft SQL Server. Search for MSSQL and you will find the official mssql-server-linux image from Microsoft. Click on "CREATE" if you want to install the latest version, if not click the button with the three dots and then on the latest tag. A view with the available versions will open, select the version you want to install, close the view with the (X) and then click create.
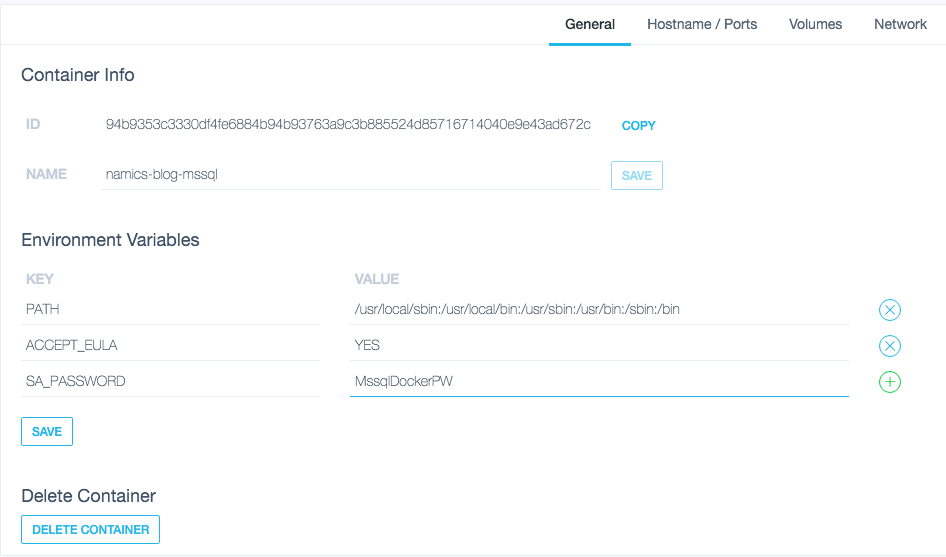
Here we use the latest version of MSSQL. When the image is installed the container starts and then you will see an error. This is because we need to make a fews settings before we can run this container. Switch to settings in the upper right corner of Kitematic.
First we give our container a name that describes the use of it. In the Environmental Variables we need to enter ACCEPT_EULA as key and YES as value and we can also set the SA_PASSWORD. Another setting to have a look at is the port setting under Hostname/Ports. You can leave it to the default value or change it to your wishes. If you change the setting, Kitematic will warn you on save if the port is already in use.
Your MSSQL server is now reachable with the address of your localhost and the Port number specified on the container.
Now that server is up and running we need some databases and here comes one advantage of docker - we can mount a volume into docker which references to our filesystem. We won’t do this in Kitematic but in the command line. So open your command line tool and enter:
docker run --name=msssqlNamics -d -v ~/MsSqlBackup:/home/backup/ microsoft/mssql-server-linux:latest
In this example ~/MsSqlBackup references to the folder in my filesystem and /home/backup/ references to the containers filesystem. microsoft/mssql-server-linux:latest is just the imageName:Version.
Now we have created a new container from an image with a reference to our filesystem where we can easily exchange files with the Docker container. If you want to create databases from backups you place the files in your local folder connect to the server with the MSSQL Management Studio restore the databases from the backup as you are used to.
Sure you don’t need to mount a local volume you can also copy the files into docker directly. The easiest way to do this is also with the command line. First find out your containers id and name by entering docker container ls. That lists all running containers.
With the name or id known enter:
docker cp ~/MsSqlBackup/testdb.bak namics-blog-mssql:/home
This will copy the files into the home folder in the container.
When everything is setup another advantage shows itself. You can commit the container into a new image. All your data and changes in the container will be saved to this new image and you can distribute it to your fellow co-workers and they will have a set of running (Sitecore-)Databases at hand. To commit the container enter the following in the command line:
docker commit 31dfb528f53f namics-blog-mssql:latest
The number is just the id of the container and then you define name:tag of the new image. When the image is committed you can find it in the command line with docker images or also in Kitematic under My Images.
Another great thing about Docker is that you are able to download different versions of software. That comes real handy if you use Apache Solr for example.
Different Sitecore projects may have different Solr versions and for sure you can install them also as services in Windows but Docker makes it real easy to just add a new container running Solr 6.6.2 for example add the indexes of your project, commit the container to a new image and you just have a default solr configuration for your project.
I’m sure there is a lot more that Docker could help with in a Sitecore project but as I am also a newbie to this topic these are the main reasons for me to use Docker at the moment.


